
By Tina Cardone
Geometry class can feel like word salad, with a heavy sprinkling of notation on top. Students need to both process and produce mathematical language in the vast majority of the tasks they work on.
Here is a portion of the warm up from a section on proving triangle congruence theorems:
Highlight each piece of given information that is used in the proof, and each line in the proof where that piece of information is used.
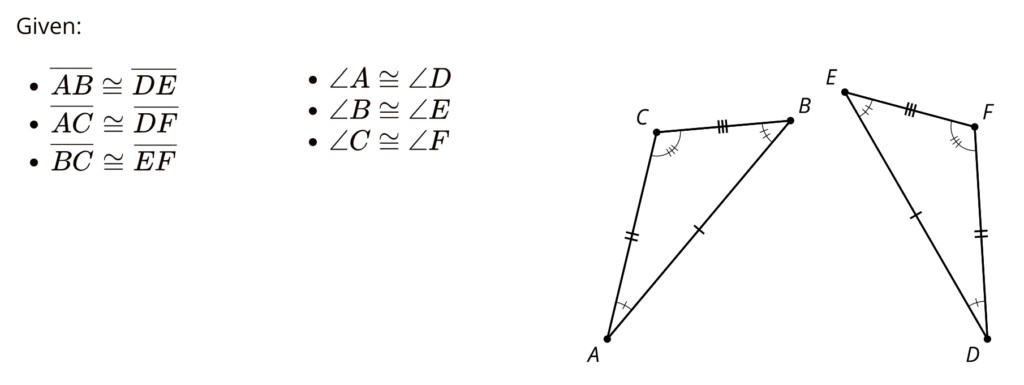
- Segments $AB$ and $DE$ are the same length so they are congruent. Therefore, there is a rigid motion that takes $AB$ to $DE$.
- Apply that rigid motion to triangle $ABC$. The image of $A$ will coincide with $D$, and the image of $B$ will coincide with $E$.
- We cannot be sure that the image of $C$ coincides with $F$ yet. If necessary, reflect the image of triangle $ABC$ across $DE$ to be sure the image of $C$, which we will call $C’$, is on the same side of $DE$ as $F$. (This reflection does not change the image of $A$ or $B$.)
- . . .
When students are learning geometry using IM 9–12 Math, we expect them to practice using the language of mathematics, but we don’t expect them to memorize definitions and theorems. This means they’ll need to be able to look things up. What might be a good way to empower students to do that?
I taught geometry for more than 5 years, and had just about as many approaches to teaching vocabulary and theorems. There were posters, dry erase sentence frames, a custom set of Taboo® cards, note sheets for tests, index cards taped to card stock . . . . Each approach had benefits and drawbacks. The central tenets across all methods were that students need to practice using the language of mathematics, and that learning geometry means learning to apply this language (which is distinct from memorizing it).
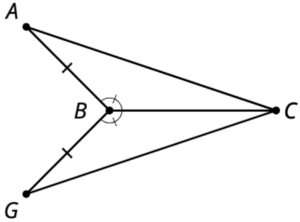
In IM 9–12 Math, we don’t expect students to interpret or recite Theorem 2.6 or SAS. Instead, the goal is for them to see “Side-Angle-Side Triangle Congruence Theorem,” remember playing the invisible triangles game, and know that if a pair of triangles share two sides and the angle between them, those triangles are congruent. Equally importantly, we hope students will look at this diagram, wonder if they have enough information to say that sides AC and GC are congruent, and think to use one of the triangle congruence theorems.
If we’re not asking students to memorize theorems and definitions, they’ll need to have a place to look them up. Every glossary term students learn is included in the glossary at the back of student workbooks. But the glossary doesn’t include all the theorems, and while alphabetical order is great if you’re looking up a word you know, it’s not great for looking for a word you’re trying to remember. Glossary terms and theorems are also included in each student lesson summary. However, having to flip through the pages while in the middle of writing on a page in the same workbook is cumbersome.
In IM 9–12 Math, students build a reference chart of important terms and theorems as they proceed through the lessons. The authors took careful note of which information would be necessary for students to use throughout the course and only those concepts are included in the reference chart. This results in a concise collection of information that students can look at while simultaneously looking at the problem they’re working on. It also travels well for any work students do outside the classroom, and provides a consistent resource for all students to use during assessments.
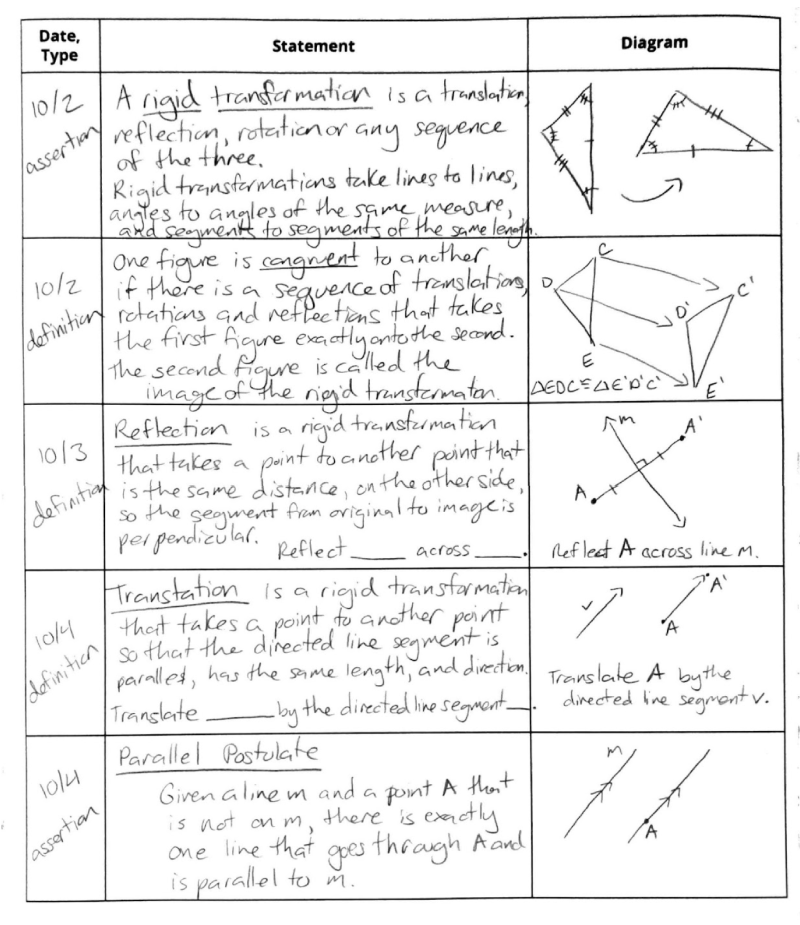
If this resource is so wonderful, why not just give it to students on day one? IM Math is a problem-based curriculum, which means that new ideas build on what students already know. Providing a 6 page (double sided!) packet would overwhelm students with information they don’t yet know how to process. By adding rows one at a time, just when students need the information, students gain both ownership and confidence with using their reference charts. Theorems are only added to the chart once students have proven them. There is an opportunity for celebration when students add a new theorem, especially one that allows them to shortcut a long and unwieldy proof via transformations.
We do recognize that it takes time for students to add entries to their reference charts. Ideally they are out on students’ desks at all times, so the time it takes is limited to the process of recording a row. Adding each entry to the chart is built into the lesson at the appropriate time, in a launch or synthesis, for students to either explicitly state a theorem they’ve proven or receive a definition or assertion they’ll need to complete the next activity. If you’re in the unfortunate situation of having fewer than 45 minutes per class period, my condolences, I understand how precious every minute of class time is. The scaffolded reference chart, intended for students who have challenges writing, is also appropriate for limiting the amount of time required to add an entry. This version doesn’t give away all of the information from the start but provides enough scaffolding that students are focused on the key terms and annotating diagrams rather than recreating them in their entirety.
If students are going to dedicate time to building a reference chart, they’d better use it! Like any other tool, students need to be taught how to use their reference charts strategically. How can the teacher help students build a habit of using the reference chart? Here are some ideas:
- At the start of class, make sure students take out their chart when they take out the rest of their materials.
- When launching an activity, ask students to point to a term they’ll need the definition of.
- During collaborative work time, if a student asks a question, ask the group, “What information in your reference chart might be relevant?”
- During the synthesis, when a student uses a theorem in a proof, ask a peer to read that theorem aloud.
- Throughout the lesson, reorient students to the class display of the reference chart.
In essence, remind students of the existence and utility of the reference chart frequently and deliberately.
Next Steps
When I was teaching I landed on a reference chart made of index cards taped to card stock, which we called flappers. It took regular reminders and effort on my part to help students learn how to use this tool, but by second semester students loved their flappers. They would respond to peer questions with “Where are your flappers?” and demand to borrow someone’s set to ensure their own were up to date. I hope your students come to love their reference charts just as much as my students learned to love their reference materials.
- What kind of relationship do your students have with their reference chart?
- How will you help students see their reference chart as a reliable assistant next school year?
